Logic Pro is a pretty insane piece of software. I’ve been using it for over five years, and I still discover new things about it from time to time. In fact, I’ve even discovered some amazing workflow shortcuts I hadn’t even known about while researching additional tips for this article! Without any further ado, let’s dive in.
Click button below to subscribe to our Youtube channel!
KEYBOARD SHORTCUTS
This is a really obvious one, but it’s also a super overlooked feature. When I see people use Logic, I often think to myself “that task could’ve been performed much quicker if you’d just pressed these keys on your keyboard.” Here are some really quick useful ones you can learn and implement to instantly optimize your workflow, in no particular order.
| ; | Move selected regions to the playhead position (instead of dragging the regions over manually). Saves a ridiculous amount of time. |
| / | Opens up a dialogue that allows you to jump to a bar or time value easily without manually moving the playhead there. |
| K | Toggle metronome |
| Shift + K | Toggle count-in |
| Enter | Jump to beginning of project |
| Command + Arrow Keys | Zoom in or out, both vertically and horizontally. Can also be achieved using Option + Mouse Scroll for vertical zoom, and Option + Shift + Mouse Scroll for horizontal zoom. |
| Shift + Enter | Rename the currently selected track. |
| Shift + N | Rename the currently selected region. |
| Option + C | Change the current region colour, or the current track colour if no region is selected. (Colour coding is often a very overlooked project organisation feature – we’ll look at this later) |
| Command + Shift + D | Create track stack from currently selected tracks. |
| G | Show/hide global tracks. (e.g. movie track, marker track, arrangement track, tempo track, etc.) |
| Option + G | Select which global tracks to display when the global tracks are toggled. |
| Command + G | Toggle region snap-to-grid. |
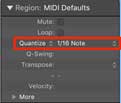
| Q | Quantize selected MIDI regions to the value selected in the region inspector (pictured below).
It’s worth noting that you can also assign custom key commands to increase or decrease the quantization value quickly (see picture below): I recommend Cmd + Alt + [ and Cmd + Alt + ]. These shortcuts all work in the piano roll editor too, for any selected MIDI notes.
|
| Shift + R | Capture Recording. This command has been a lifesaver for me. It captures what you’ve just played as MIDI, and prints it to the selected track as a MIDI region. Sometimes you can hit play and, out of the blue, improvise a sick synth solo over the music you’ve just been working on. It turns out to be absolutely perfect, but you didn’t record it! No matter – simply hit Shift + R and what you played last will be saved as a MIDI region. Remember, this command only works if the playhead was moving while you were improvising. As soon as you hit play or record again, your last played MIDI sequence will be deleted and the capture recording function will reset. |
| Command + L | If you have a MIDI controller with a series of knobs and faders, this command is particularly useful. Select any plug-in parameter (examples include filter cutoff, gain, detune, etc.), hit Command + L and then move a knob or fader on your controller to instantly link the two. From that point on, that fader will control that specific plugin parameter. The best part is that this assignment is global – it’s not exclusive to the project file that you’ve been working on! |
| Command + Number Keys | Each different number key will open up a different editor in a separate window when combined with the command key. I recommend familiarising yourself with them.
Command + 1: Main Window Command + 2: Mixer Window Command + 3: Smart Controls Window Command + 4: Piano Roll Window Command + 5: Score Editor Window Command + 7: Event List Window (yes, Command + 6 doesn’t do anything) Command + 8: Project Audio Window Command + 9: MIDI Transform Window |
| Option + K | Open key commands window. |
| Option + P | Open project settings window. |
ASSIGNING CUSTOM SHORTCUTS
Beyond the standard keyboard shortcuts, you can also assign your own ones to functions you constantly use: for instance, I’ve got a key set to opening the instrument plugin window on the track I currently have selected, and this has saved me SO much time compared to when I’d manually move my mouse to the channel strip to open the plugin window. I also have some custom score editor commands configured, from when I used to use Logic’s score editor (before I switched to Sibelius and Dorico for notation). Just hit Option + K to bring up the ‘key commands’ window.
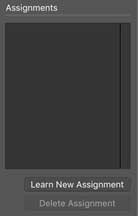
A closely related workflow tip is to assign buttons on your MIDI controller to certain functions instead of keyboard shortcuts. This is done using the same menu as the keyboard shortcuts, but using the ‘assignments’ section on the bottom right of the screen instead.
MIDI CHASE
When you’re working with MIDI, you’ll find yourself setting the playhead in the middle of a note quite a lot. Logic’s default way to treat this is to disregard the notes your playhead is already on and just play the ones afterward but if you have a very lengthy MIDI drone or sustained chord underneath everything, it can get tiresome having to play the track right from the beginning to hear the drone/chord every time. There’s a simple but effective solution to this, and surprisingly it doesn’t involving splitting, freezing the track or bouncing it out to audio.
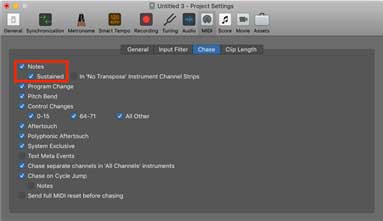
This was a feature I was unaware of for the longest time, and I suspect it’ll be worth enlightening people. Open your project settings and navigate to the MIDI section (Option + P is the default keyboard shortcut to open this window; alternatively, go to File > Project Settings > MIDI). Then, navigate to the tab labelled ‘Chase.’ There, tick ‘notes.’ After enabling this, if you start playback halfway through a note, Logic will then play that note until the playhead shifts off of it (effectively splitting the note at the playhead’s position for playback). By default, the ‘sustained’ tickbox is ticked, which does the same thing for notes that have been released, but continue to play as a result of sustain pedal automation. My preference is to turn this one off – I use my sustain pedal a lot, and it tends to result in messy playback otherwise.
HANDY PROJECT ORGANISATION SHORTCUTS
We’re all guilty of this. I often get carried away with my composing work, and as a result I let my project organisation fall apart. I often find myself duplicating MIDI regions (and even entire tracks!) without bothering to renaming them because I’m so involved in the creative process. Renaming each region accordingly and sorting out the colour coding manually can be a real pain… but there’s a couple of really useful shortcuts you can use to save time while still remaining organised.
On the main tracking window, navigate to the ‘Functions’ button (in between ‘Edit’ and ‘View’) and click it. Immediately at the top of the menu, we find some extremely handy shortcuts to boost our session organisation.

If we find that our region names are all over the place, we can get our track names consistent first, then select the regions and use the “Name Regions by Track Name” shortcut. The “Name Track by Region Name” shortcut is also useful, especially in situations where the track name is set to a default value (e.g. “Inst 17”).
I rely on colour coding quite a lot in my sessions. Below is a snapshot of one of the projects I’m working on. As you can see, the project would get messy real fast if it weren’t for the colour coding and careful naming. It’s far from perfect, and I’m sure there are professionals out there with far superior naming and colouring conventions compared to what I have here – nevertheless, case in point, it’s so vital to have some form of colour coding in place when working with large projects. Because of the way Logic handles colour coding, I find myself with mismatching track and region colours quite often, which is why I use the “Color Regions by Track Color” and “Color Track by Region Color” shortcuts frequently.
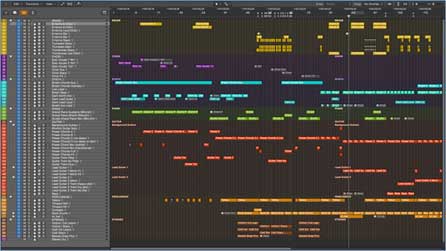
The best part about these functions is that they have keyboard shortcuts! so in time, you won’t even need to open that menu to organise your projects. Convenient, eh?
CUSTOM TEMPLATES
Finally, we reach the largest of my favourite workflow solutions that Logic has to offer. This one takes the most time to set up, but I find it’s also the most rewarding. I’m constantly astounded at the number of people who simply open up an empty Logic project template and start composing/producing from scratch. You can create custom templates in Logic instead, and in my opinion this is a must-have. This template doesn’t need to be a comprehensive collection of the plugins you constantly use (although that’s definitely an option!) – I’m talking about a basic template that you can start composing/producing from. Here, you can set up all your reverb buses, workflow windows, project settings, etc. and in doing so, you’ll be saving yourself SO much time. If you set your template up cleverly, you can also include some project organisation features. I’ll walk you through the process.
CONFIGURE PROJECT
Let’s start right from scratch with an empty template. First of all, you want to go into your Project Settings and set up all the basic settings – MIDI Chase, audio settings, metronome settings and so on. A lot of this depends on context, so I won’t go into this section in lots of detail.
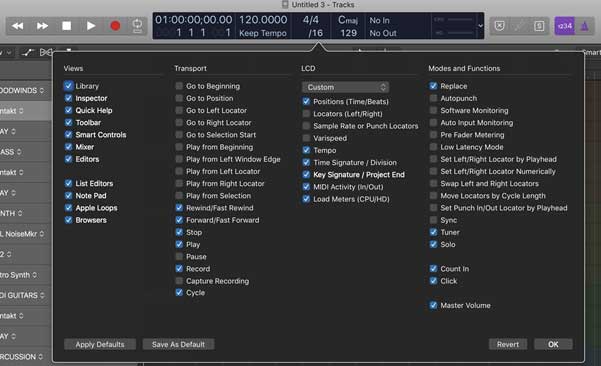
I also take this opportunity to set up the information I want displayed on the transport display at the top, as well as any tools I might need. Here’s a quick snapshot of my settings.
TRACK SETUP
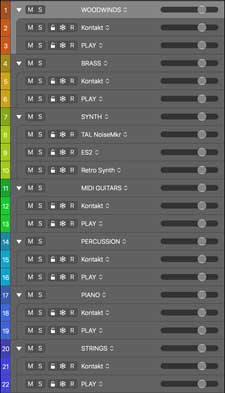
Next, I like to set up a few tracks with some blank plugin instances which I can quickly access to load up my favourite sample libraries. My two main samplers here are Native Instruments’s Kontakt and East West’s PLAY. However, instead of just having one pair of these blank instances and leaving it there, I like to set up a few track stacks for each different instrument category I typically use, then place a pair of blank instances in each stack. I then go through and colour-code each category. I can also load up my most used synth plugins here.
At this point, I like to configure my track header components (keyboard shortcut: Option + T): I usually tick colour bars, track protect, track freeze and track alternatives. I also like to untick ‘track icons.’ Yes, they’re aesthetically pleasing when set up right, but they’re too much of a bother for me to change every time I make a new track. I find the default ones look quite ugly as well, so I just hide them.
To save yourself from having to go through setting this up each time you make a new template, you can go to the bottom of the track header configuration menu, click the gear icon and hit “Store as User Defaults.” Easy!
Below is a snapshot of what the resulting track list looks like.
Finally, you can take this opportunity to set up your effect buses – reverbs, delays and all that jazz. I only really use a reverb plugin in my workflow, so I like to set that up on a bus track and then link all my tracks to said reverb bus. It’s worth turning off the sends until you use them though. (See picture below)

WORKSPACE WINDOWS
Last but not least, let’s set up our workspace. I take advantage of Logic’s super useful ‘screensets’ feature quite a lot – I have individual screensets set up for MIDI editing, score editing and mixing. I run Logic on a dual monitor setup which makes things quite a bit easier, but let’s work on a single monitor for the sake of accessibility, and for the purpose of this template walkthrough.
Screensets can be configured through clicking the “1” on Logic’s main system menu. Through this menu, we can create as many screensets as we need, and then switch between them using the number keys on our keyboard.
It’s also worth mentioning that pressing a number without a corresponding screen set will just create a new blank screenset with that number assigned to it.
Once again, your screenset configurations will depend on your own personal preferences. My single-monitor setup would go something like this:
- Main window only
- MIDI editing: Main window + piano roll editor window
- Score editing: Main window + score editor window
- Mixing desk: Main window + mixer window
Note that by default, each screenset will remember the layout of the windows you had open before switching to another screenset, which can be both helpful and hindering. Fortunately, once you configure your screen sets, you have the option of locking them using the screen set menu. That way, you’ll still be able to move windows around or open/close them, but as soon as you navigate back to the same screenset, it’ll revert to the locked layout. I typically like to keep my screenset 1 unlocked, while having the rest locked.
CONCLUSION
I hope you found these tips useful, and I hope that they speed up your workflow significantly! Thanks for tuning in.
Quick side note: I’m thinking of releasing a similar tips article/video devoted entirely to Logic Pro’s score editor. While not as powerful as a dedicated scoring program such as Dorico or Finale, it still contains a multitude of useful features that you can take advantage of if you ever need to quickly prepare lead sheets for live performers. If you’re interested in finding out how you can implement this into your workflow, let us know! Leave a comment on the video or the blog post.
















6 Responses
Nice article. Thanks for making it. Is there a way to set a keyboard shortcut to start a midi transform preset on a group of selected notes?
I believe there is a way to set shortcuts for user-defined midi transform presets, but I don’t think you can do this for the default ones. If you open the key commands window and search for “transform,” a bunch of shortcuts related to applying user transform presets appear, and you can assign a key command to any of these. Hope that helps.
I usually just hit Command + 9 to open up the MIDI transform window – I believe this is the fastest way 🙂
I made a template which included my most used items. When I called it up and attempted to play my virtual instruments I had a one or two second lag. I have 32 gig of ram, apple imac 2017, Logic 10.4. Can you tell me why this is happening. I have made a template with just a few tracks and do not have this problem.
Not too sure why this is happening, but have you tried decreasing your buffer size in audio settings? Preferences > Audio > Devices > I/O Buffer Size. I’m unsure what else to suggest at this point though, I’m running on a similar setup (iMac 2015 with 32 gigs) and I’ve never encountered lag that intense.
If you’re using Kontakt, there’s a few optimizations you can enable within Kontakt itself – I’m not an expert on the matter, but there’s resources online which may help you.
Beyond that, I’m afraid I don’t know what’s happening sorry!
I look forward to your upcoming score editor video. Thanks!
Really useful. Thanks.
Comments are closed.