Sometimes, as music producers, we come up with these great ideas. For some of us, it takes a while, but when we’re on a roll, we’re on a roll, and we start laying down various elements: phrases, bass riffs, arpeggios, you name it.
The initial idea(s) come quickly and are pretty straightforward given you have the right sounds in front of you, but then we hit a wall during the mixing stage.
If this is you, don’t feel bad, it’s a common struggle for most artists and music producers because every single decision made impacts the overall sound, and it’s easy to lose perspective.
- Spending hours finding and tweaking the drums to be crisp and upfront instead of dull and low
- Initial satisfaction with the mix that fades by the next day when everything sounds flat and lacks clarity
- You’re using good sounds, but still unable to achieve the final professional touch
- Comparing your mixes with your peer’s mixes yours always sounding like it’s lacking something
- You have good gear and plugins but not understanding what they’re for or when to use them
All of this gets so frustrating when all you want to do is get a decent, playable mix of your music that doesn’t sound like trash!
Not all is lost, there is great information out there on how to improve the sound quality of your music, here are a few of those tips you’ll come across.

The Classic EQ is a parametric equalizer featuring multiple bands of adjustable frequency, gain, and Q, making it ideal for corrective and creative EQ.
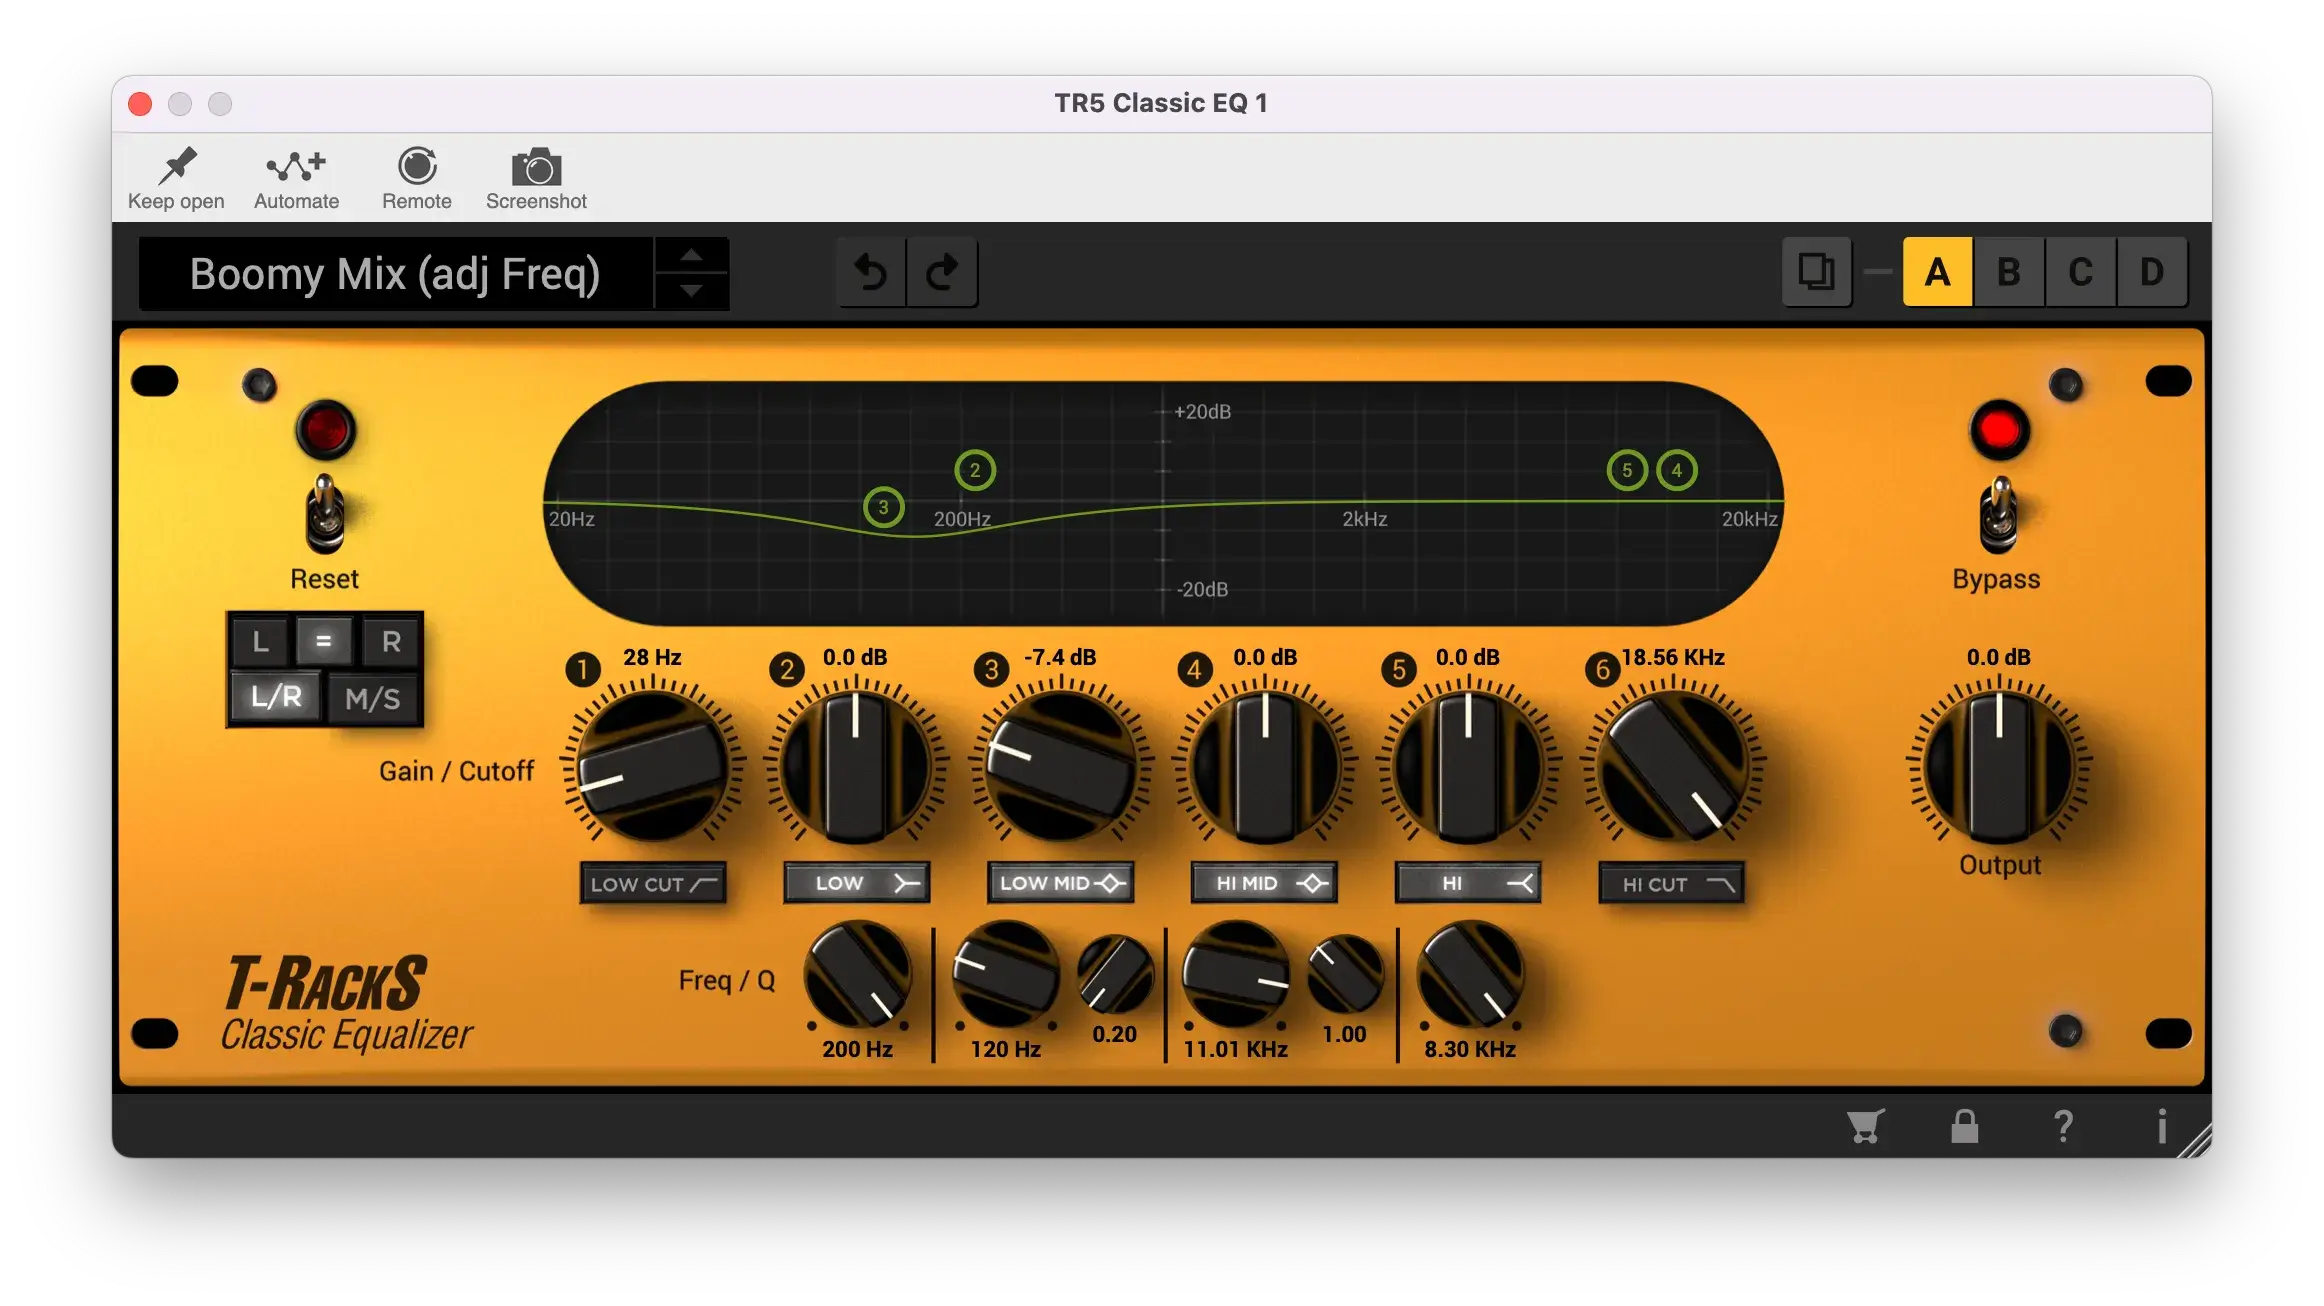
Use it to remove unwanted frequencies, enhance specific elements in a mix, or sculpt the overall tonal balance of individual tracks.
It’s important to note that this is not a coloring EQ, but one that is transparent which makes it a go-to for clean and accurate, transparent adjustments.
Mixing and Mastering
- FX Presets: Tailored for fx you’d use to spice up a mix; phone, radio, etc
- Generic Presets: General mixing tasks; removing mud from mix, sparkle, drums, guitar, presets and more
- Mastering Presets: The presets are designed to help you obtain polished finalize results to your music
The EQ P-1A is inspired by the Pultec EQ, known for its unique ability to boost and cut the same frequency, a technique known as the Pultec Trick.
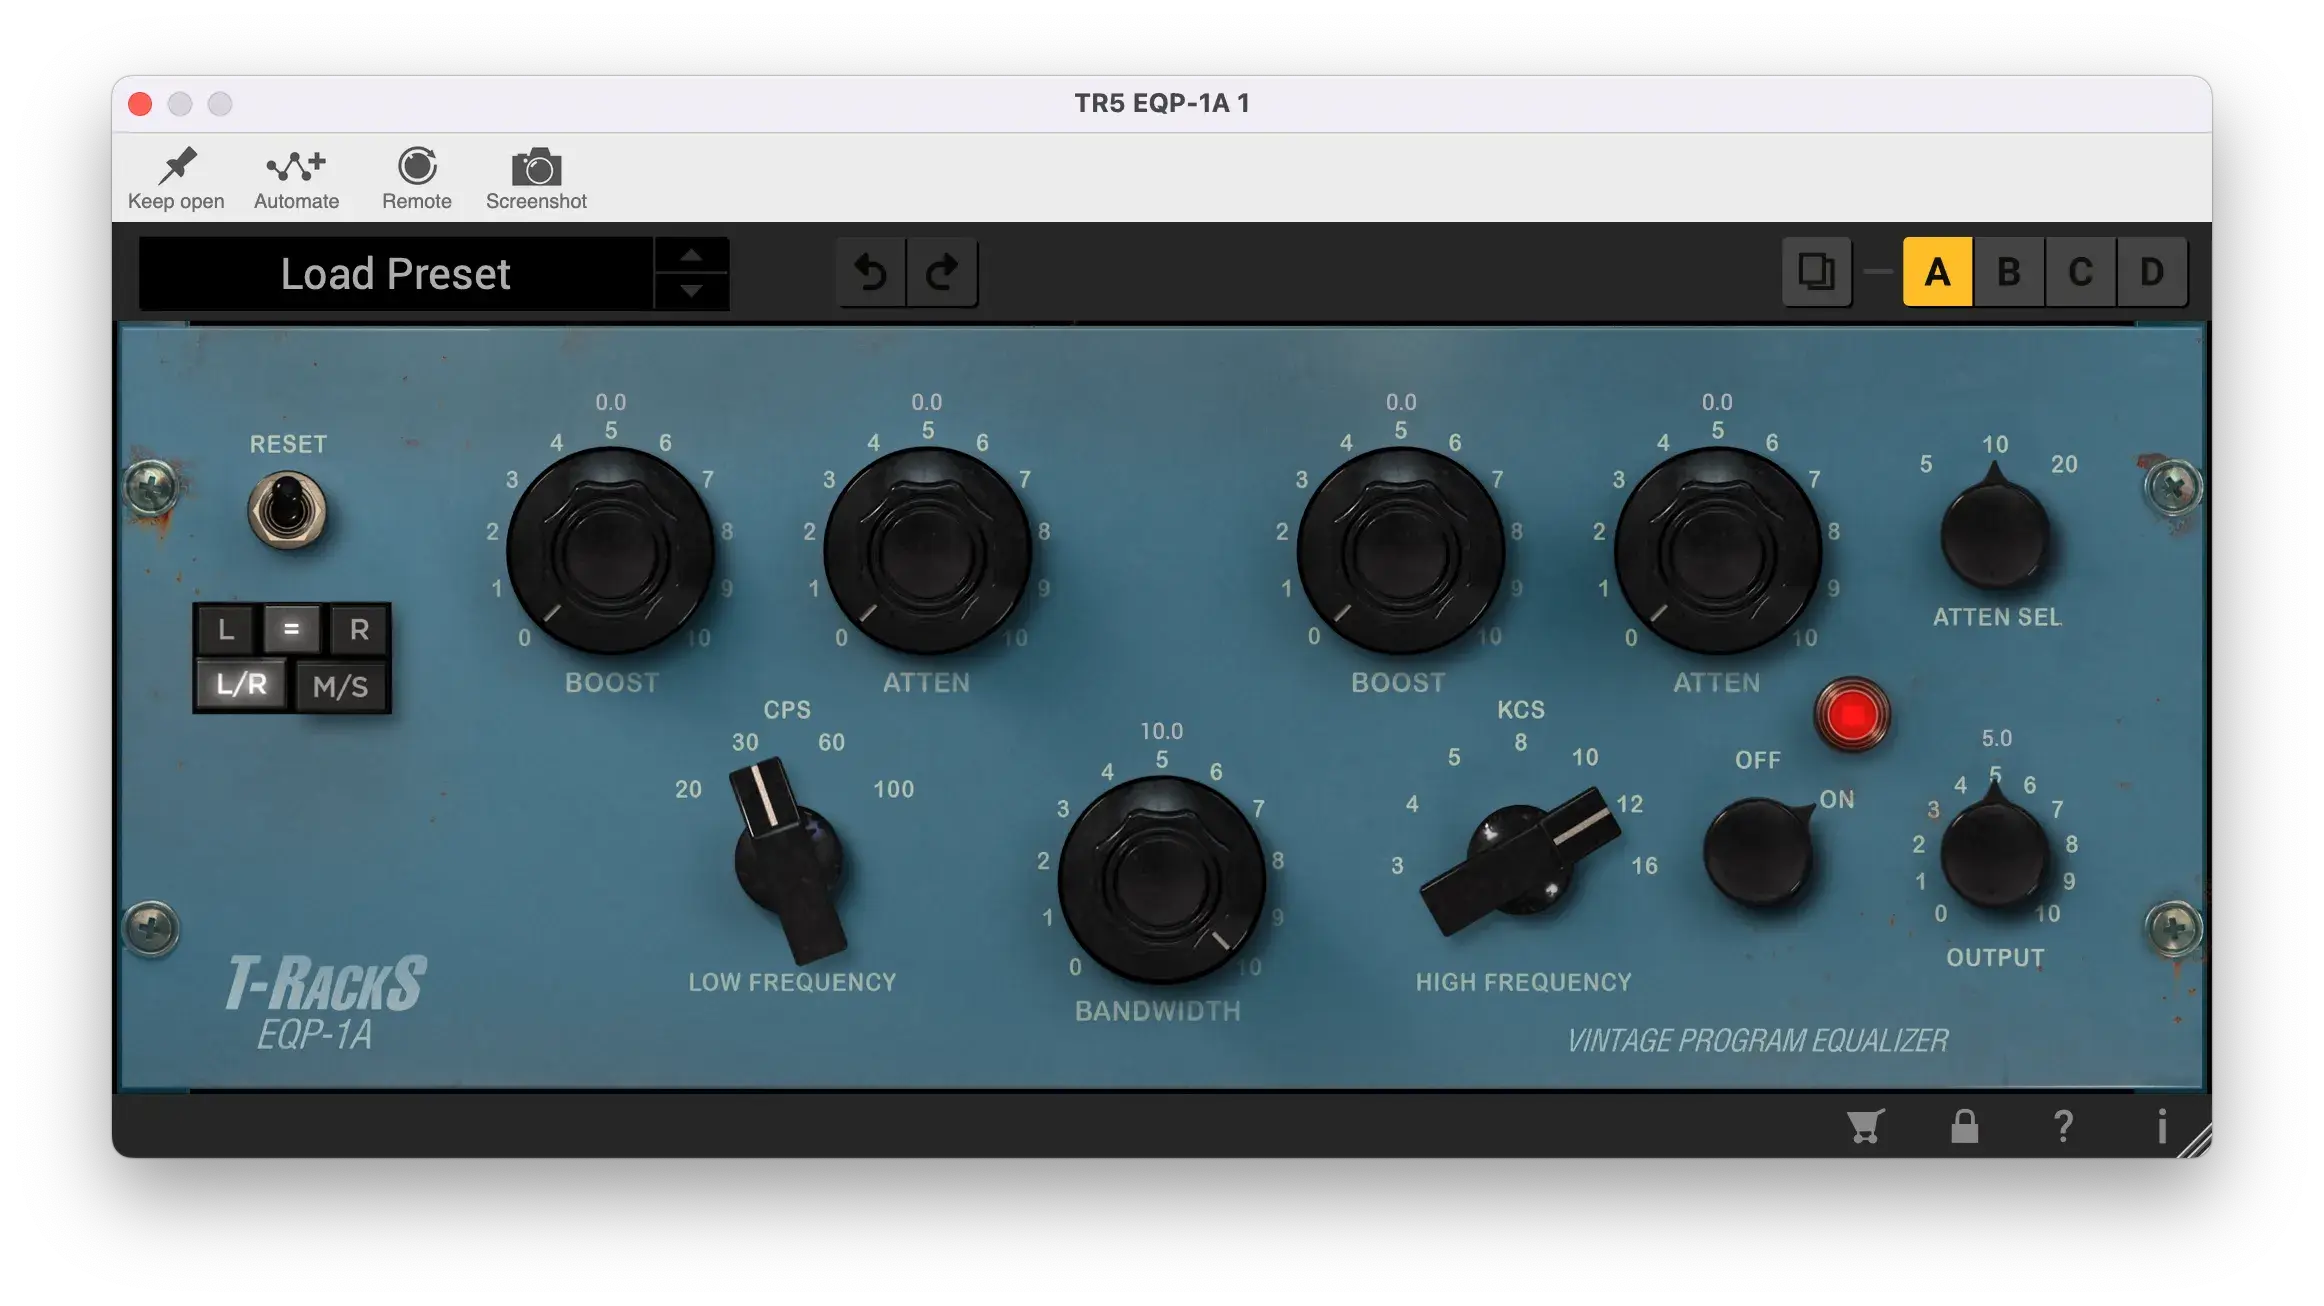
This trick allows for adding low-end punch while cleaning up muddiness at the same time, this really comes in handy when mixing kick drums and bass.
The smooth and musical EQ curves make it perfect for adding richness and character to your tracks. Use it on individual instruments or the mix bus EQ is ideal for adding analog warmth and depth, making your tracks stand out with a little vintage character.
EQP-1A Features
Boost and Attenuation: Controls for boosting or cutting low and high frequencies.
Bandwidth: Adjusts the width of the frequency band being affected.
Frequency Selection: Chooses specific low and high frequencies for boost/cut.
L/R and M/S Processing: Provides left/right and mid/side processing for enhanced stereo control.
Opto Compressors emulate the smooth and musical compression style of classic optical compressors. The T-RackS Red Opto Compressor combines the characteristics of both the LA-2A and LA-3A.

The slow attack and release times make them ideal for controlling the dynamics of bass, synths, vocals, and other sounds where you want to maintain the original performance while gently controlling the dynamics.
This gentle “hug” provides a natural and transparent compression effect.
Optos are generally not the first choice for taming peaky transients, such as those found in drums and percussion sounds. However, their smooth and musical compression makes them perfect for adding warmth and subtle control to a wide range of other instruments.
| Parameter | Compressor Setting | Goal |
|---|---|---|
| Set the Compressor Ratio | Start with 4:1, to gently compress the drum bus without over-compressing the dynamics. | Achieve a cohesive and balanced drum sound. |
| Adjust the Attack Time | Set attack time between 10-30ms to allow initial transients of the drums to cut through | Maintain the natural punch and presence of the drums. |
| Set the Release Time | Set the release time to between 60-200ms to ensure the compression recovers without causing pumping. | Create a smooth and natural decay for the drum hits. |
| Adjust Input and Output Knobs | Adjust the input to set the threshold for compression. Use the output knob to match the level after compression | Maintain the overall volume balance while applying compression. |
| Stereo Channels: L/R and M/S | Click link to make sure both left and right channels are compressed equally. Or adjust each side individually | Use to preserve or manipulate the stereo image |
| Monitor Gain Reduction | Aim for 2-4dB of gain reduction to add cohesion without squashing the dynamics. | Achieve a balanced and controlled compression. |
-min")
The Black 76 compressor emulates the 1176, known for its fast attack and release times. It’s perfect for adding punch and presence to drums, vocals, and other instruments that can create issues (think plucked instruments).
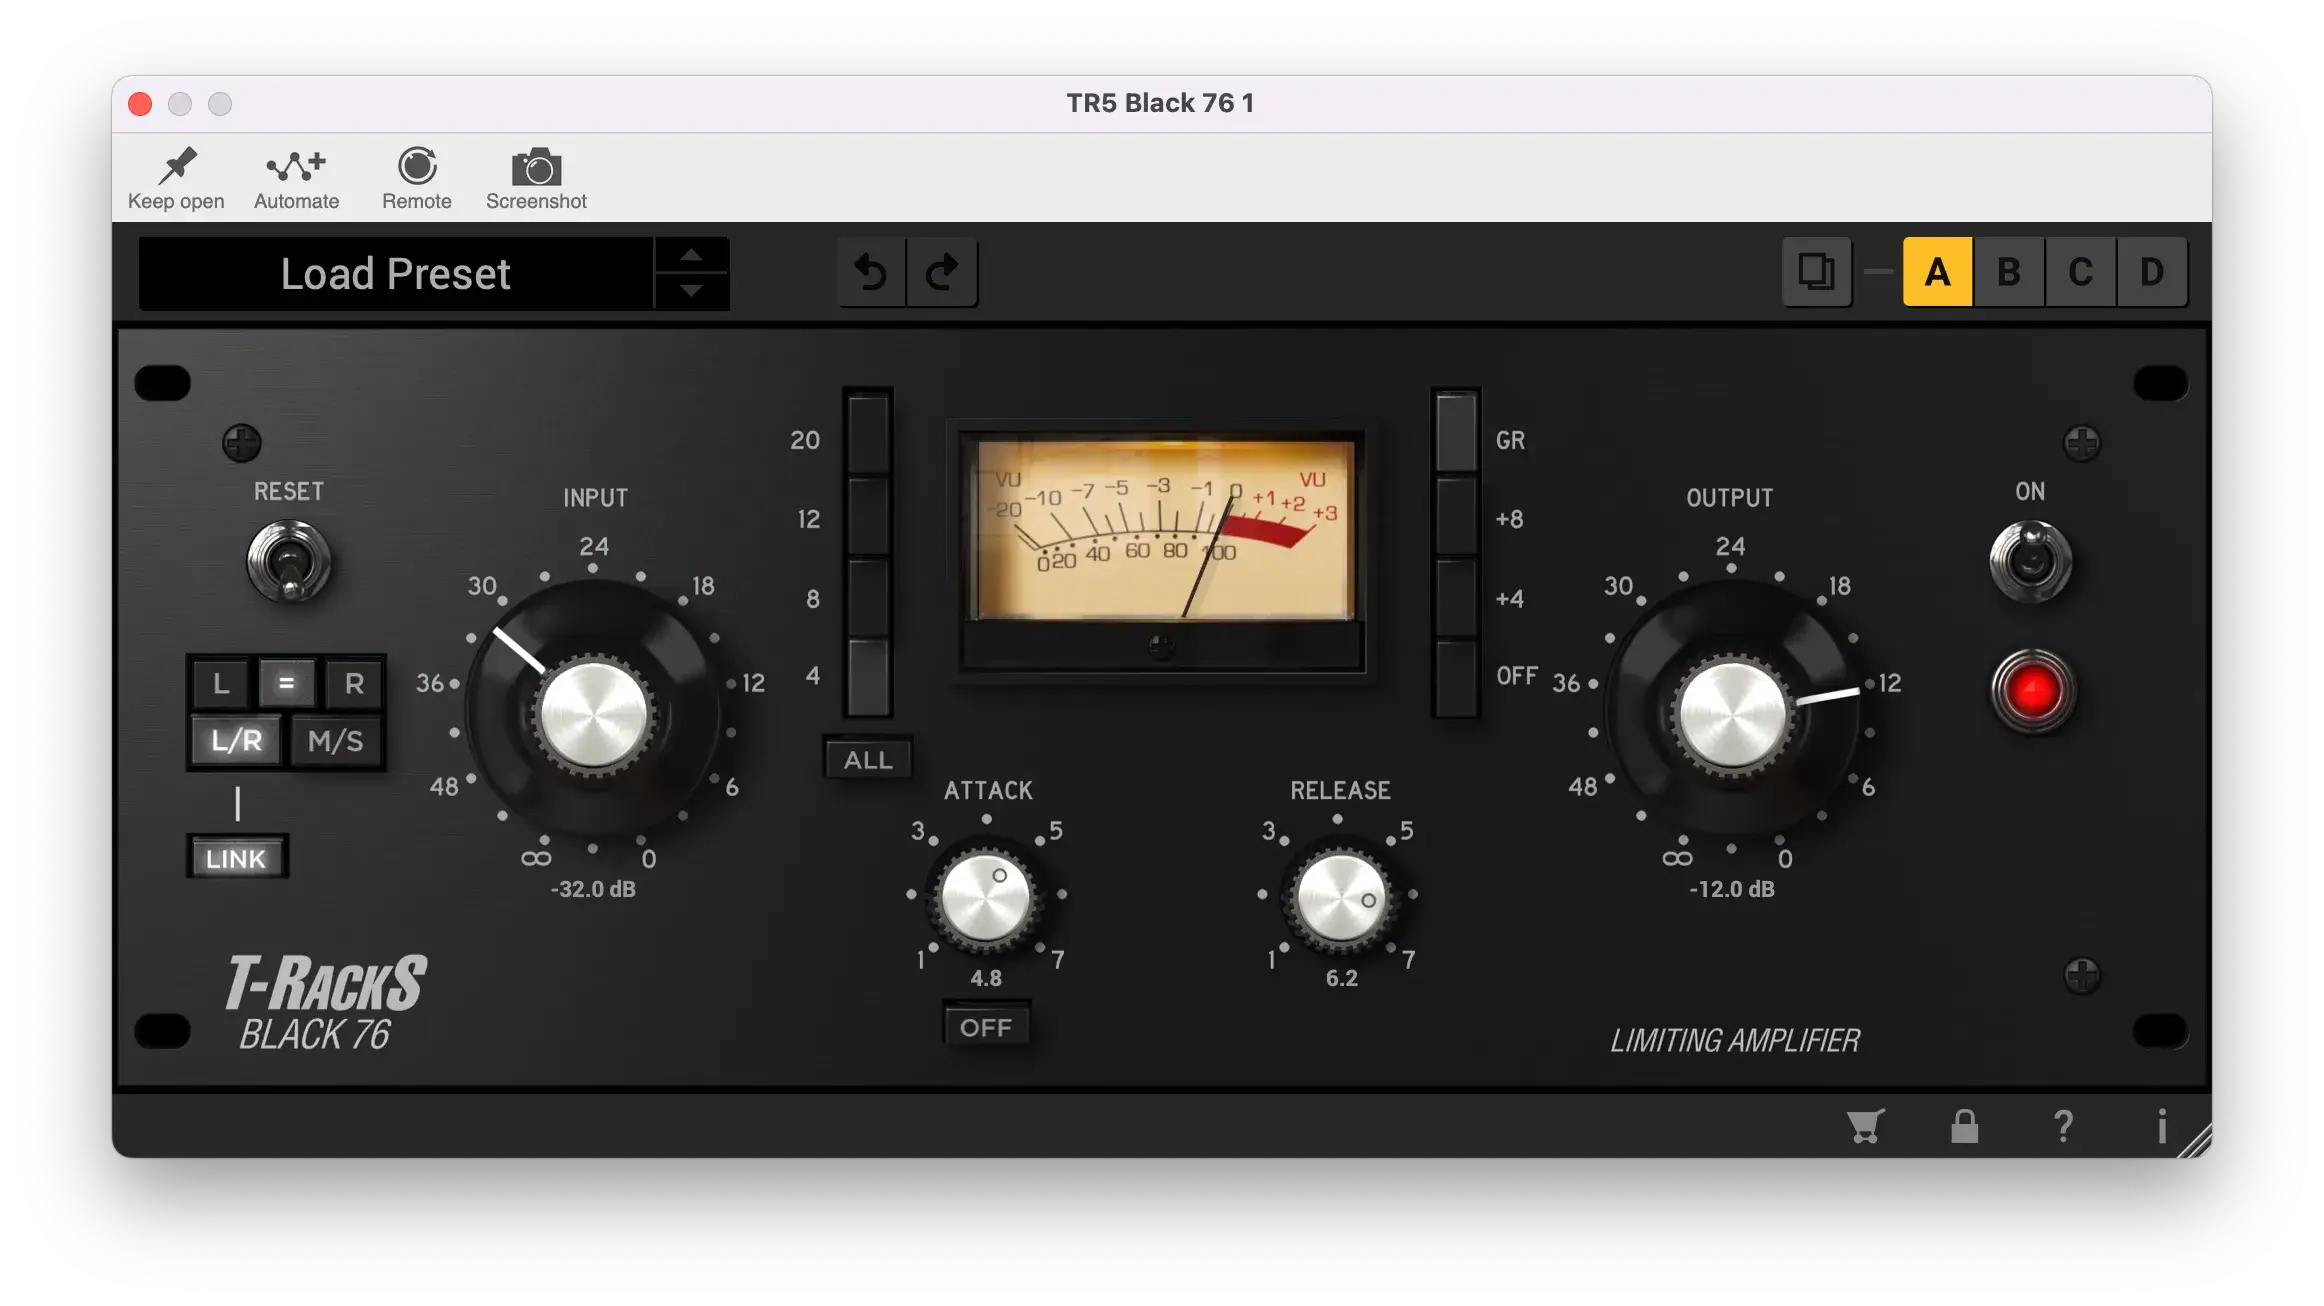
Use it to catch peaks and add aggressive compression without sacrificing the natural dynamics of the performance.
Black 76 Main Features
- Attack and Release: The 1176 has inverted controls. Meaning, the larger numbers mean fast attack while lower (1) means slow. That said, the attack is how fast the audio is compressed and release is when the 76 stops compressing the audio signal.
- Simplicity: With just a few knobs, the Black 76 is straightforward and easy to use, making it ideal for quickly dialing in the perfect compression settings.
- Input/Output Knobs: Adjusts the level entering the compressor, which affects the amount of compression. The Output knob controls the overall output level.
- All Button Mode: Sums all ratios for an aggressive compression sound.
Try the All button in M/S mode, I like over compressing the sides of drum breaks.
The Clipper in T-RackS 5 is designed to add harmonic distortion and saturation, making it ideal for giving your tracks more presence and punch.
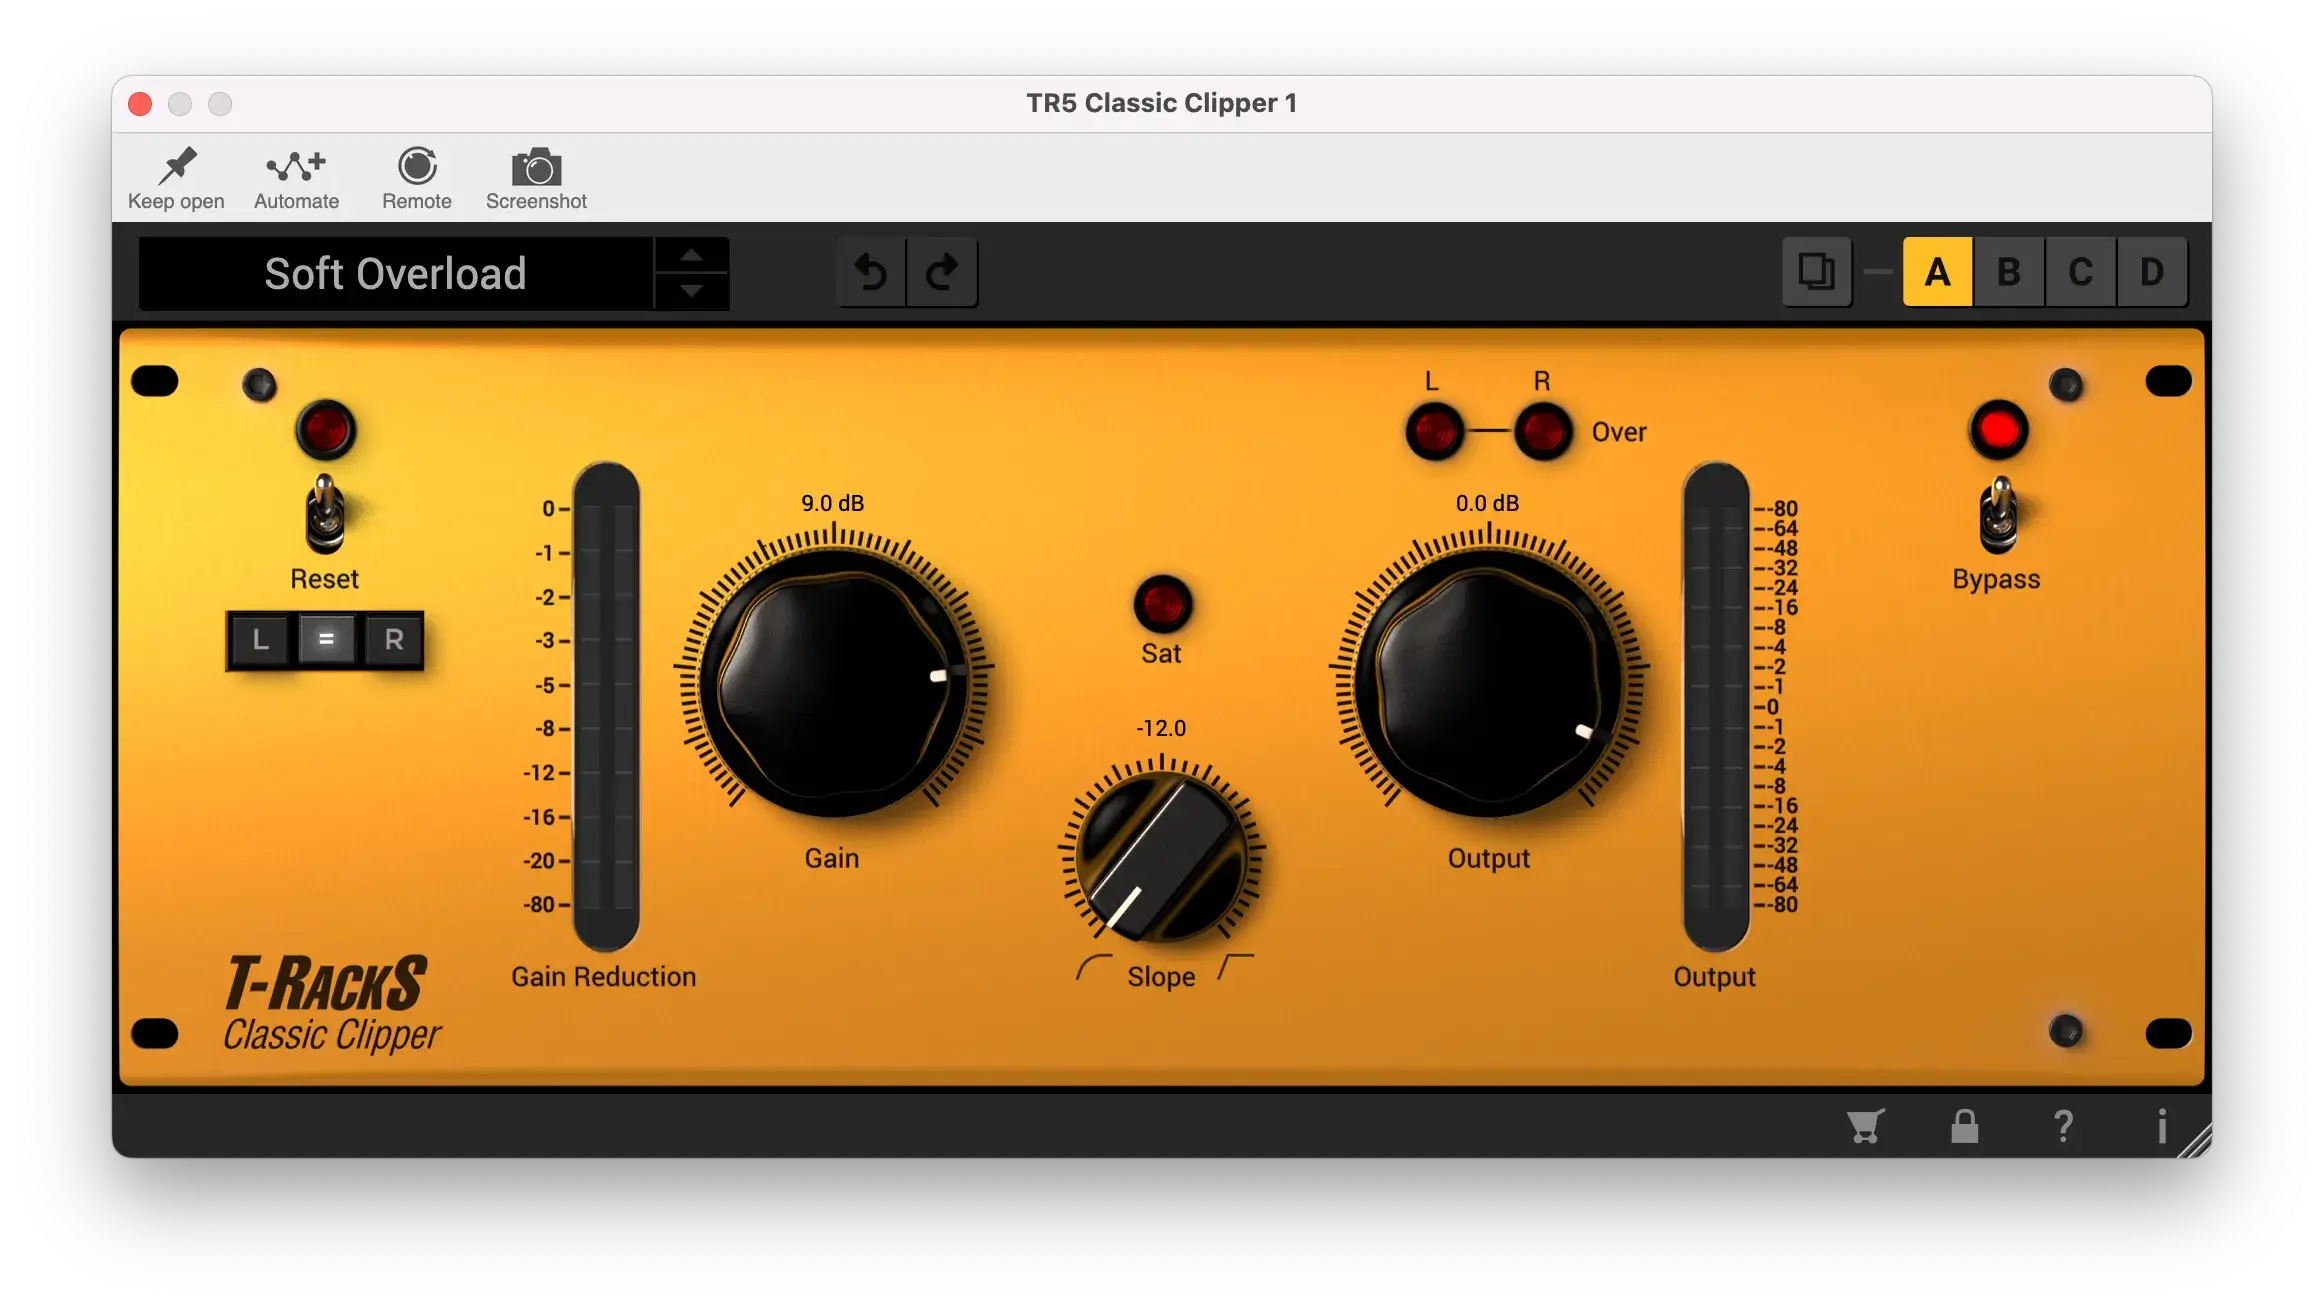
Use it on drums, guitars, or even the mix bus to add a bit of grit and character. Its ability to shave off peaks in a musically way can also help increase the perceived loudness of your tracks, one of the main reasons its so popular.
Experiment with the Clipper to find the right balance between clean and colored sound.
T-RackS Clipper Mixing Tips
Over the years, T-RackS Clipper has been a go to for many producers across various genres. It’s a great hard and soft clipper that, when used creatively, can produce better bass lines, bold kicks and really help a mix compete commercially
Tips for Making Your Kicks and 808s Standout Using The T-RackS Clipper
Set the Input Gain: Increase the input gain to drive the 808 into the Clipper, adding harmonic distortion and making the bass sound fuller and more present.
Adjust the Ceiling: Lower the ceiling slightly to ensure the 808 doesn’t peak above other elements in the mix, maintaining clarity and punch.
Adjust The Slope: The slope will let you change the clipper from soft to hard or somewhere in between. This will help you to add warmth and grit, enhancing the 808’s presence.
Use Parallel Processing: Blend the clipped signal with the dry signal to retain the 808’s original character while adding punch and texture.
Monitor Levels: Keep an eye on the output levels to avoid unwanted distortion. Its easy to get out of control seeing how far you can push the levels, but remember the goal, the 808 needs to sit well with the rest of the track.
T-RackS Clipper: Mix Bus Tips
Adding Cohesion: Applying the Clipper on the mix bus can glue elements together, making the overall mix sound more cohesive and unified. This is generally done with a compressor, but the clipper does well in some cases.
Increasing Loudness: This is what a lot of people using it, CLIPPING, but without the distortion. To do this turn the slop knob all counter clockwise to the rounded slope.
Transient Control: You’re either rounding them out or hard clipping them.
Adding Character: You don’t need a lot for this. The subtle harmonic distortion can add a lot of character. Use in moderation.
The Bus Compressor, often called the “glue compressor,” is a VCA style compressor used to add cohesion to your mixes. This is done by compressing buses or subgroups together to create a unified sound. The results are smooth and musical, or what some would refer to as a gel-like sound.
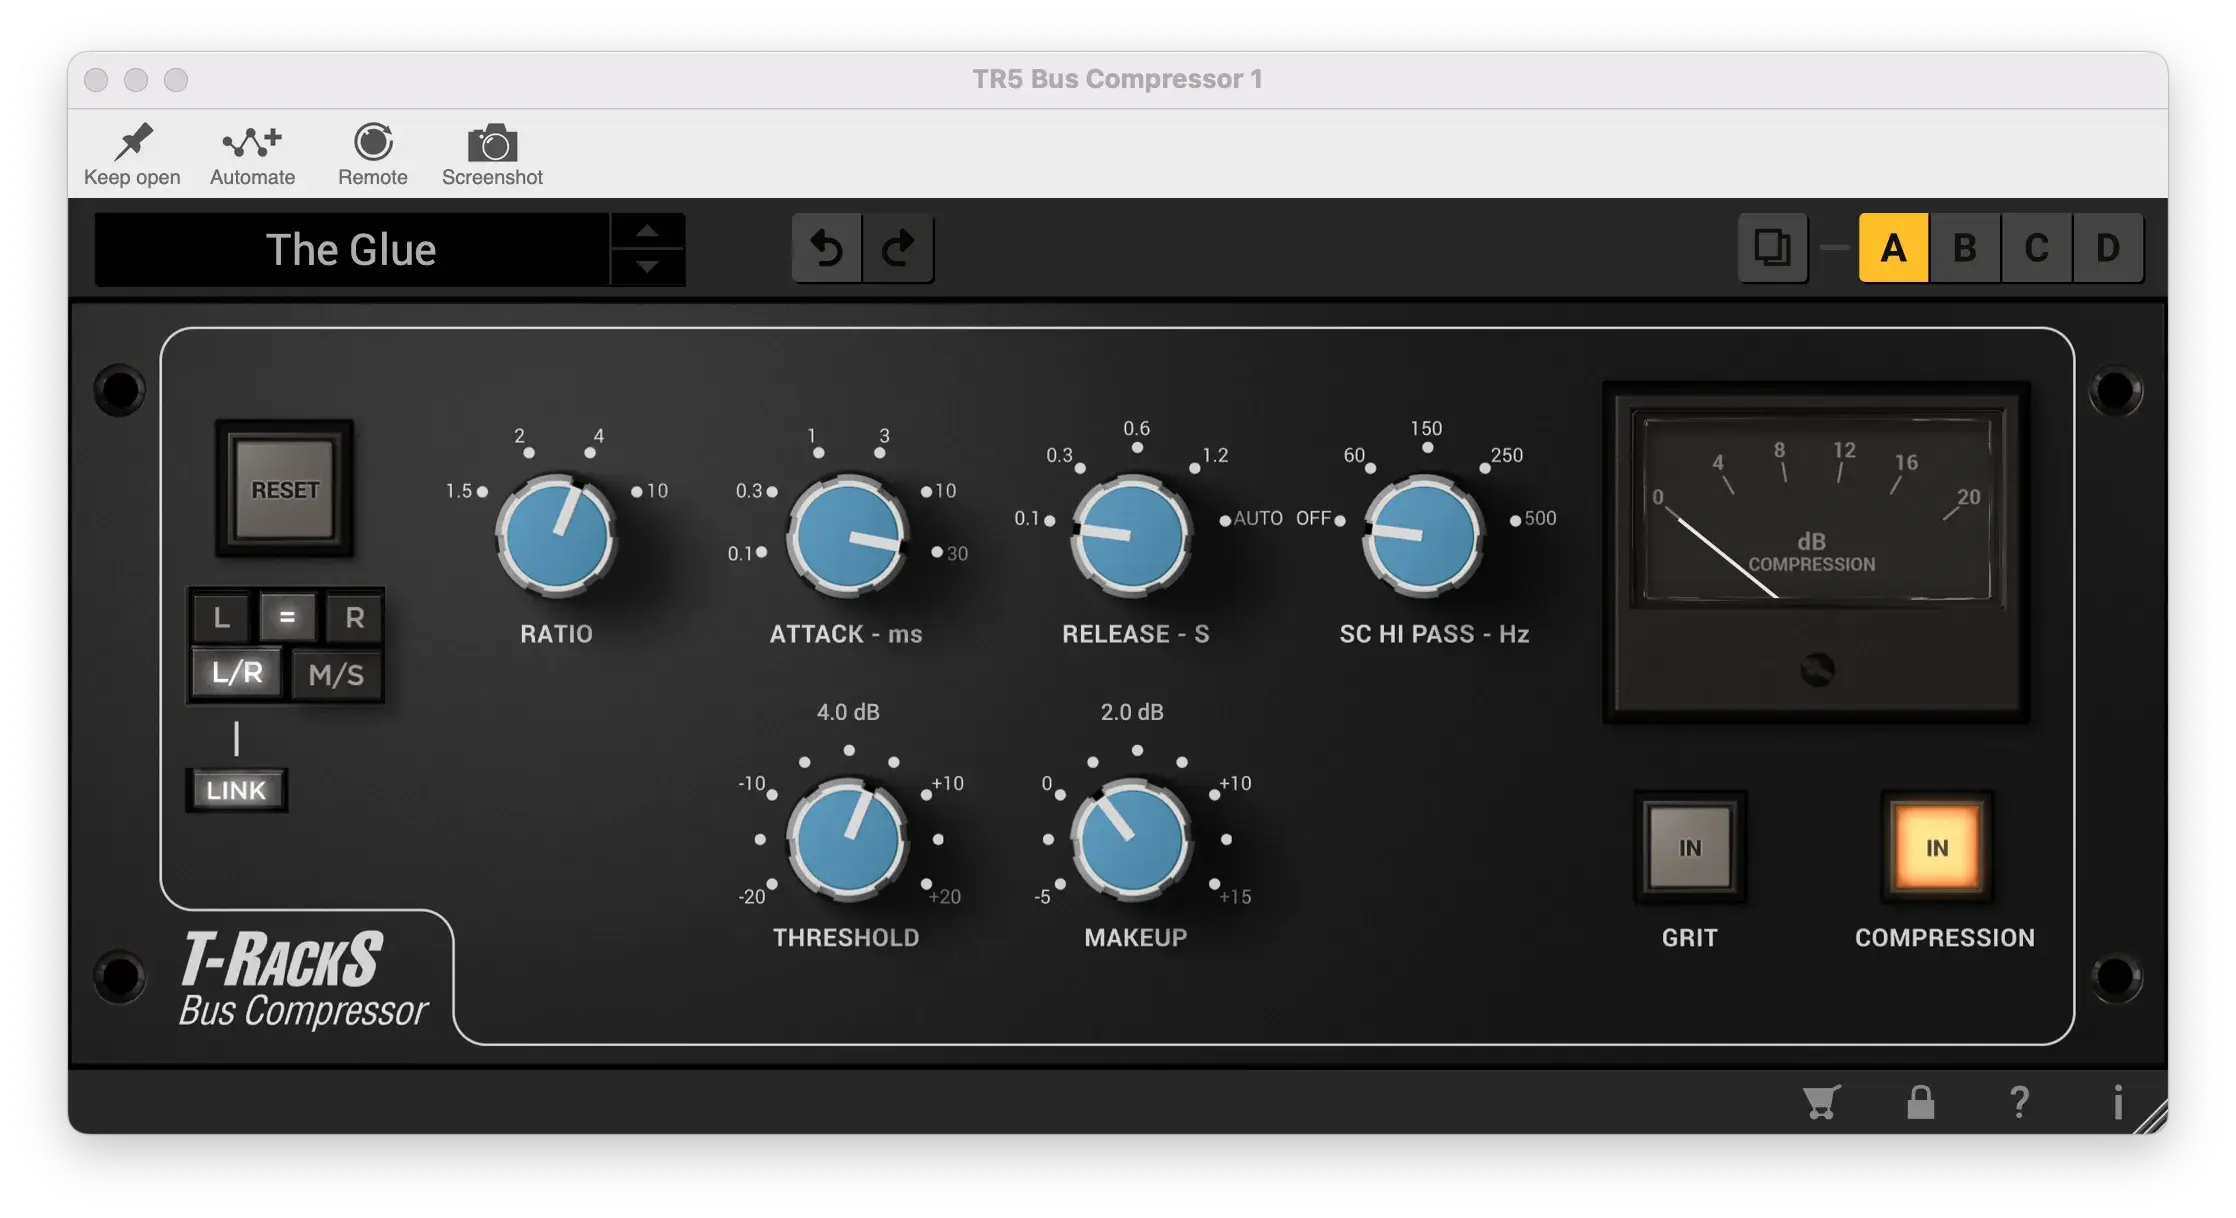
However, it can also help deliver punch and presence, depending on how it’s used.
Here are some settings you can play with to help you get that glue like feel with the Bus Compressor outside of using the stock preset of course.
| Setting | Description | Goal |
|---|---|---|
| Gain Reduction | Apply gentle compression to glue the mix together without making it sound overly compressed. | Maintains natural dynamics and transparency of the overall mix. |
| Release | Keep the release setting within the slower ranges | This will keep the compressor in a constant light state of compression |
| Slow Attack | Aim for slower attach times to retain the punch and not chop off transients. | Preserves the initial transients, such as drum hits and pluck sounds |
| Soft Ratio | Start soft a ratio of 1.5:1 to 2:1 on your bus | Applies gentle compression that smooths out the mix |
| High-Pass Filter | Start with setting between 60 and 150 | Prevents low-frequency sounds from causing excessive gain reduction |
| Match the Gain | Set the gain for whatever was reduced during the compression stage | Compensates for loudness |
The settings you need to use will depend on your song, but this is enough to give you the gist and get you started.
The Multiband Limiter gives the option to adjust 3 bands (low, mid, high) ensuring that each frequency band is controlled independently, preserving the overall balance of the mix.
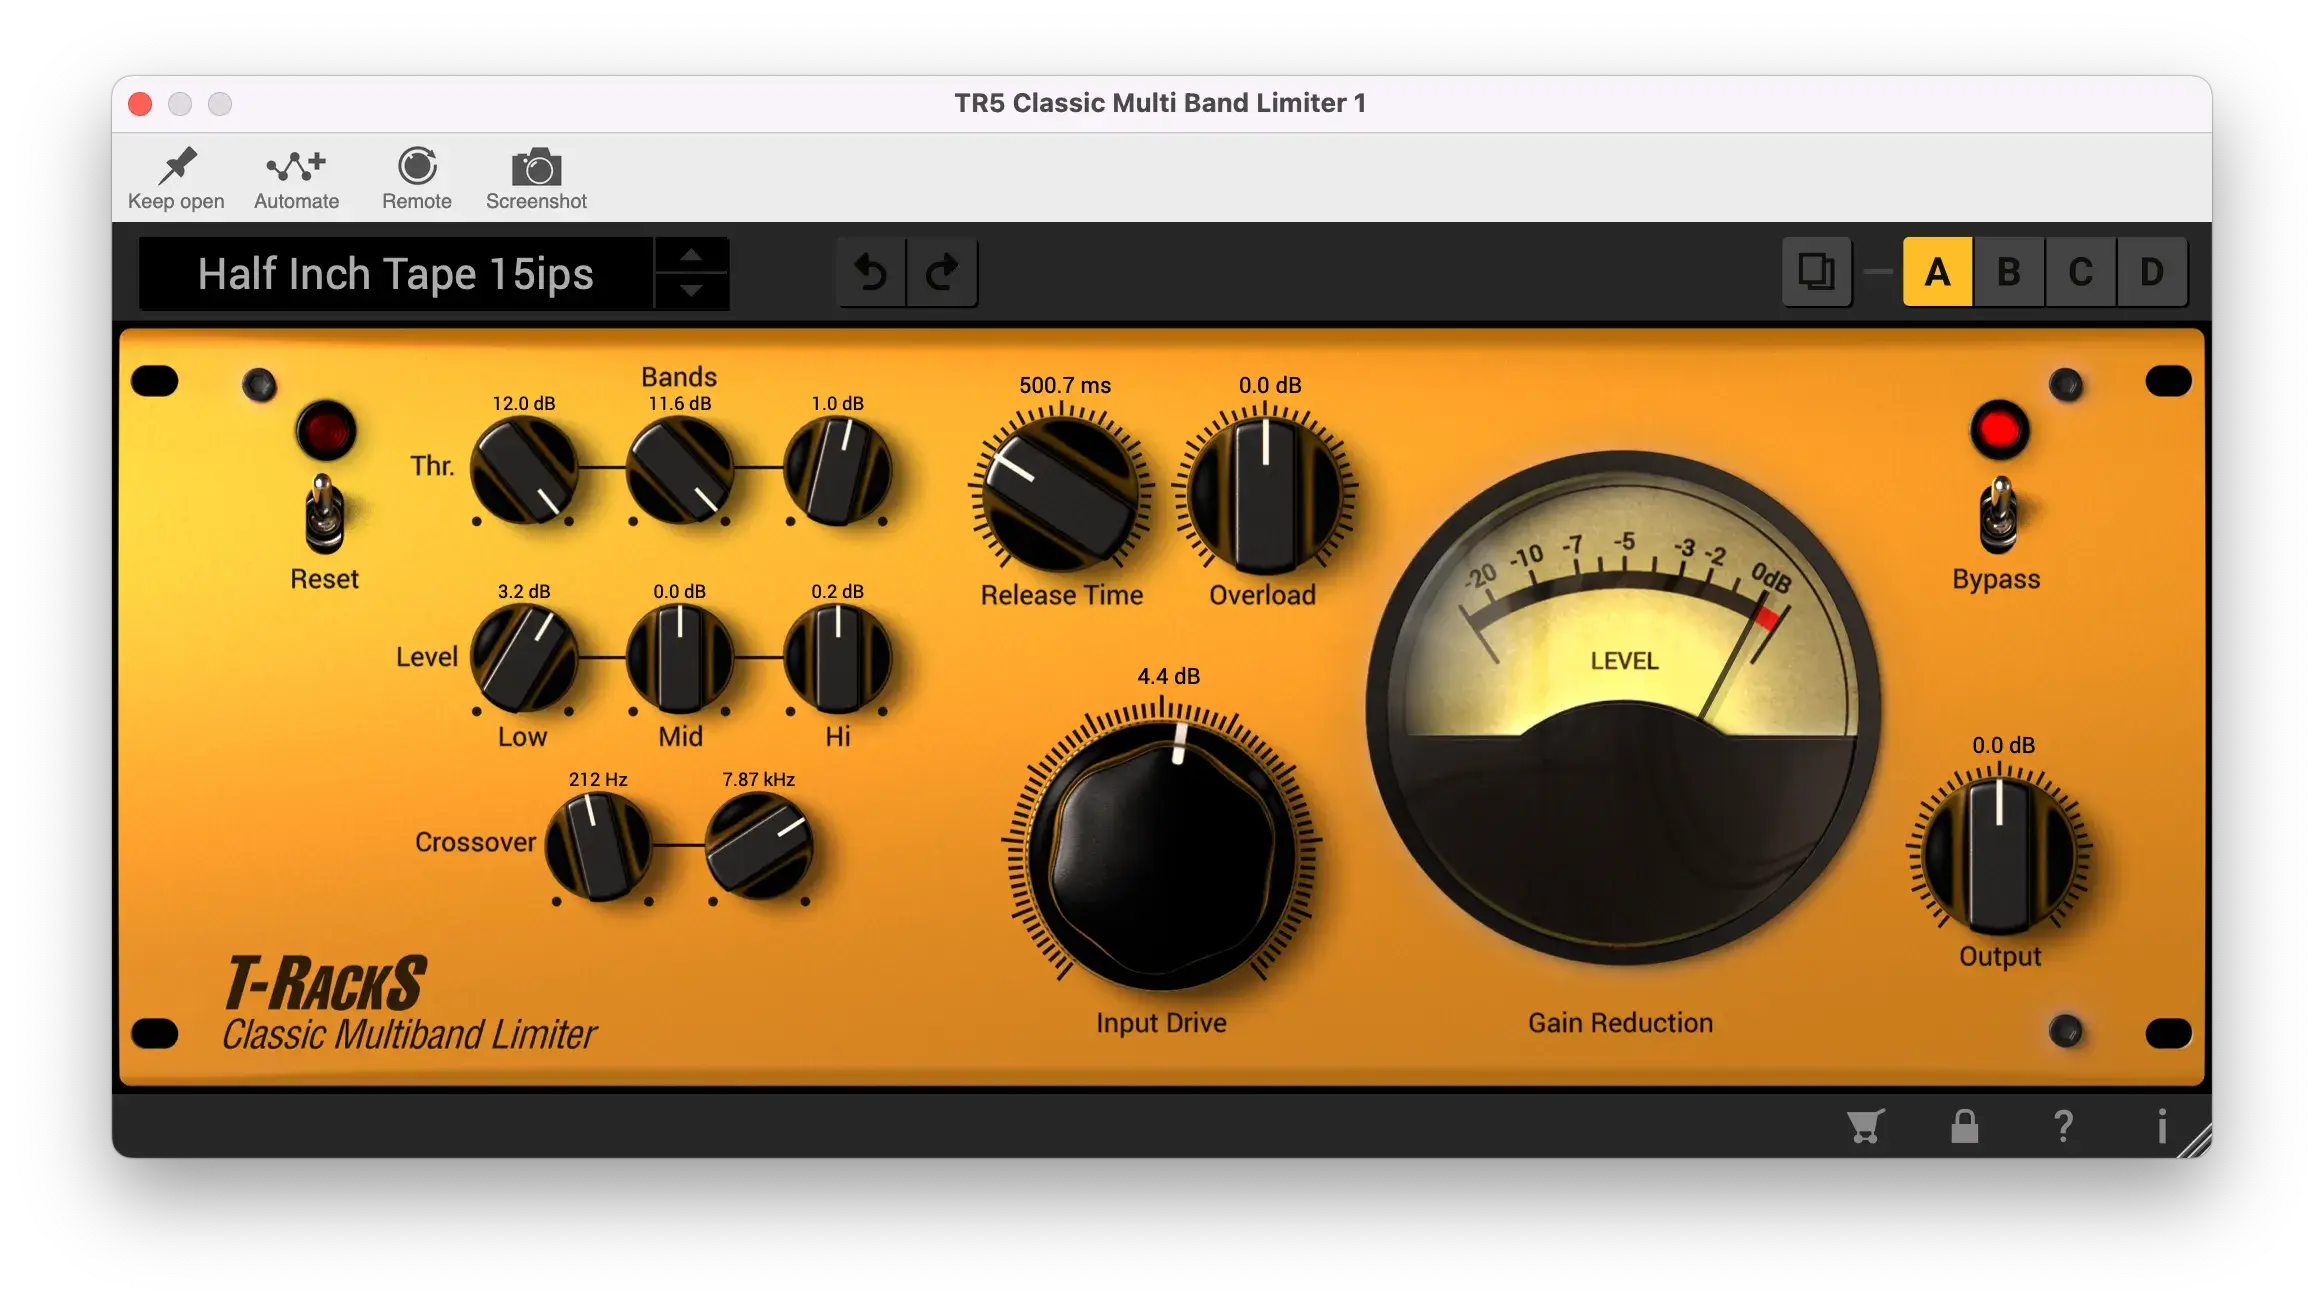
Here are some tips for using the MB Limiter
| Mixing Goal | Method | Benefit |
|---|---|---|
| Taming Harsh Frequencies | Adjust the threshold and level of the high band to control sibilance and harshness | Ensures a smoother and more pleasant high-frequency response. |
| Tightening the Low End | Adjust low band to control and tighten bass frequencies | Achieves a well-defined and controlled bass without muddiness. |
| Balancing the Mix | Adjust all 3 band’s level to help each sit well in the mix, using the crossover points to fine-tune which frequencies | Creates a balanced and cohesive sound, making sure no single frequency range dominates the mix. |
The Master EQ 432 is a quality emulation of the MES-432 by Sontec and is used specifically for mastering applications. Subtle changes make a big difference in sound with an EQ and could take a little bit of getting used to given how powerful it is.
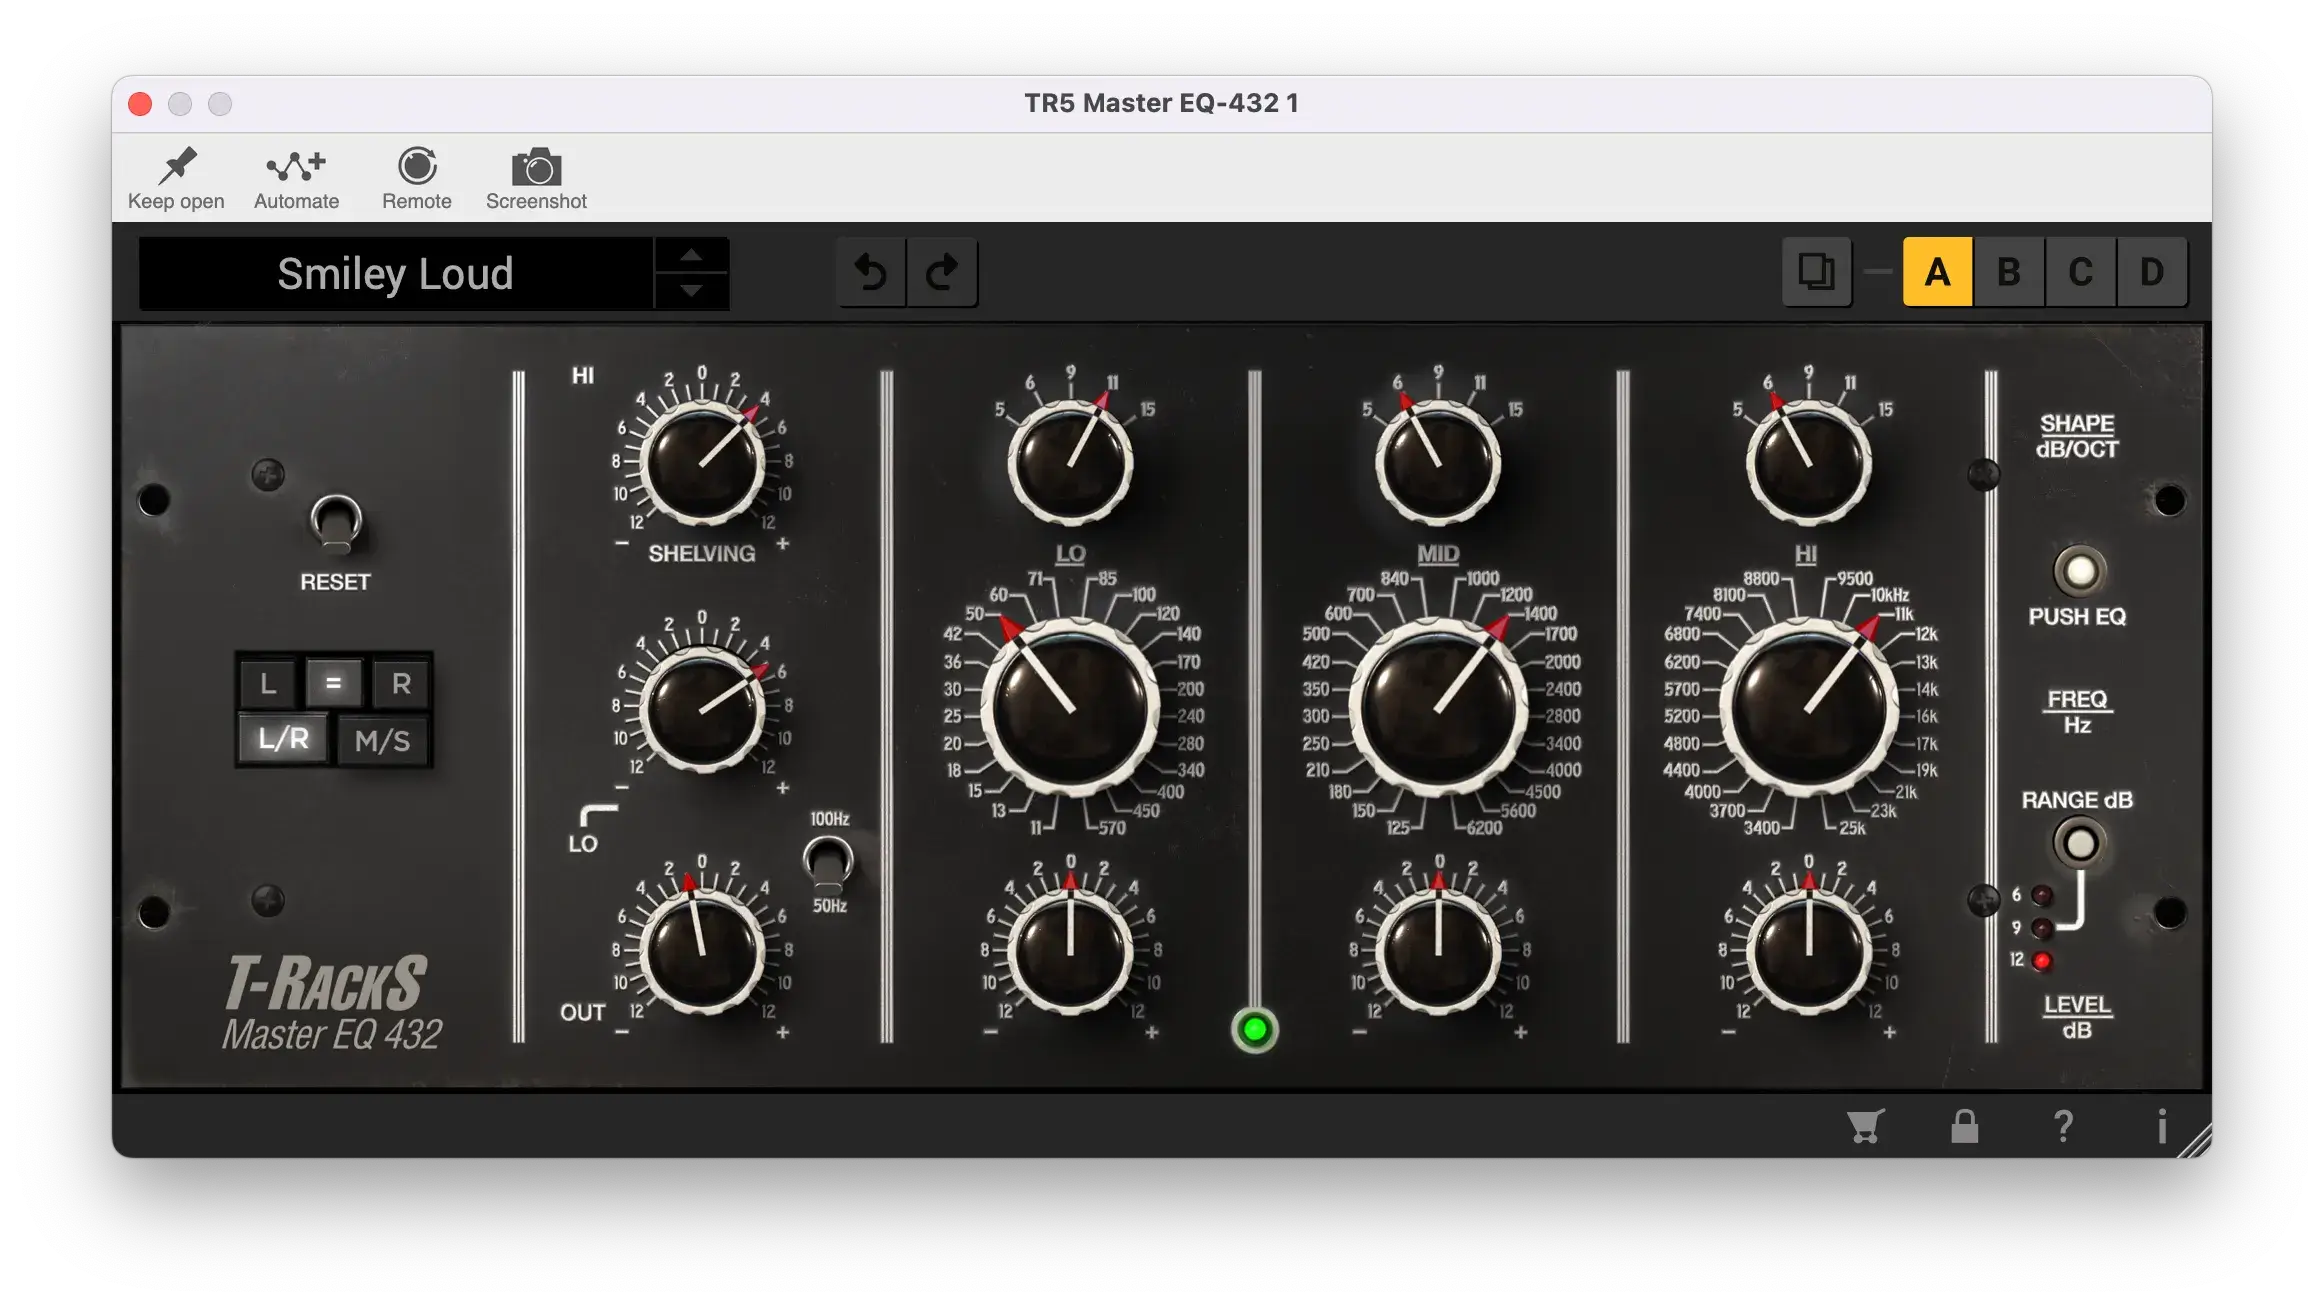
I personally like using this on my master bus and creating separate mixes for the mid and the sides.
Shape and Range
Now, understanding the listed frequencies and Gain should be quite straightforward; however, let’s discuss the shape control and push EQ.
Shape Control (dB/OCT): This setting allows you to adjust the slope of the EQ curves giving you the ability to make bold tonal changes. A gentle slope will give you a natural sound while a steeper slope will give you more distinct and precise adjustments.
Push EQ: When activated, this feature adds a gain stage to make more noticeable EQ changes. It can be beneficial for creating tonal shifts when needed, providing added flexibility and strength to your EQ adjustments.
Tips for Mastering with the Master EQ 432
| Frequency Range | Purpose | Adjustment Effects |
|---|---|---|
| High Shelf (10kHz – 20kHz) | Adding air and sparkle | Boosting 10-12kHz adds brightness and air, making the mix sound more open and lively. |
| Midrange (250Hz – 2kHz) | Shaping body and character | Boosting 500Hz-1kHz adds warmth, making the mix sound fuller. 800Hz-2kHz helps bring out the presence |
| Low-Mid (100Hz – 250Hz) | Adding warmth and fullness | Boosting 100-200Hz can add depth overpowering the mix. Too much can add mud. |
| Low Shelf (20Hz – 100Hz) | Enhancing sub-bass and low frequency information | Boosting 60-80Hz adds thump and power to the low end. 40-60Hz adds sub-bass depth, providing a rich and full low-end presence. |
These tips are good starting points and might not work for every genre, so adjust based on the specific needs of your mix.
The ONE combines EQ, Transient Design, Compression, Stereo Imaging, A Limiter, and Analog Emulation all in ONE plugin.
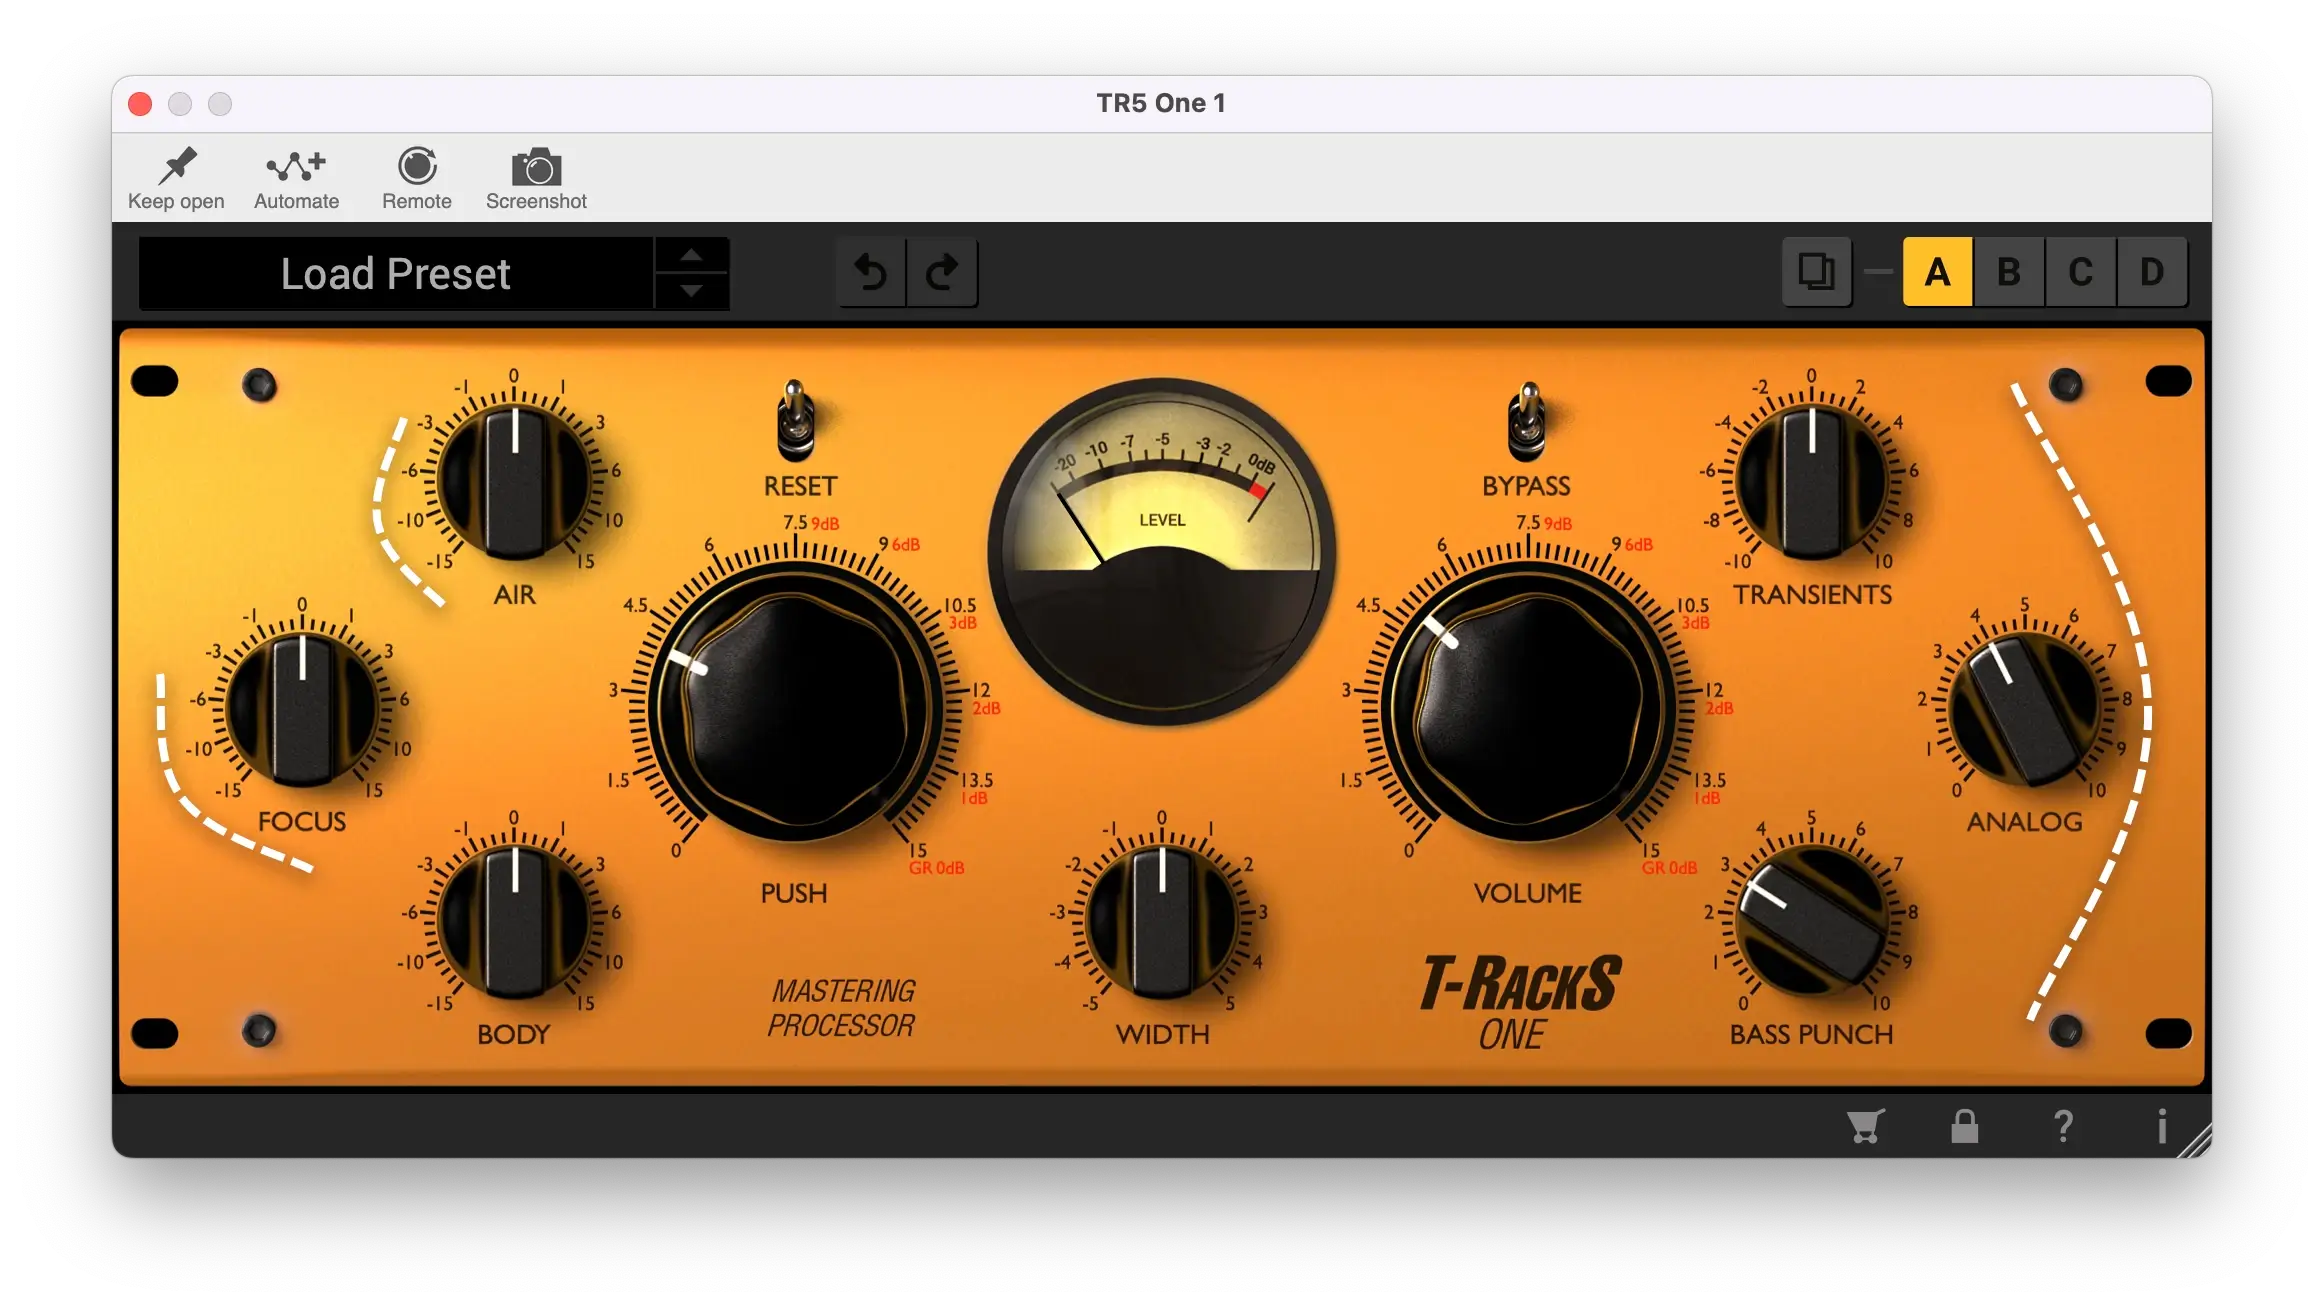
This is perfect for use on both mix buses and individual tracks, it offers a quick and efficient way to enhance your overall sound without fiddling around with complex mixing/mastering chains and settings.
One thing you’ll notice about The ONE is that its settings might not be immediately clear if you’re new to mixing.
IK Multimedia uses audio production jargon for labeling, which can be a bit confusing.
To make things easier, here’s a breakdown of what each setting means.
The ONE’s Settings
- Air: Adds brightness and clarity by pushing high frequencies.
- Focus: Enhances midrange frequencies for more defined vocals and instruments.
- Body: Adds warmth and fullness to the lower frequencies.
- Push: Controls compression, increasing overall loudness and presence.
- Width: Adjusts the stereo field for spatial depth.
- Transients: Enhances attack for punchier sounds.
- Analog: Adds analog warmth and harmonic distortion.
- Bass Punch: Boosts low-end frequencies for more impactful bass.
- Volume: Controls the overall output level.
Mixing can be tough, but I’ve found a great chain in the T-RackS 5 bundle that can make a big difference. Start with the Classic EQ to shape your frequencies, followed by the Saturator X to warm up the midrange and add harmonic richness.
Then use the Stereo Imager to control the width of your mix, enhancing spatial depth and separating elements in the stereo field.
Next, apply the Bus Compressor for cohesive and punchy dynamics, and finish with the Stealth Limiter to control peaks and increase loudness.
These plugins were chosen for their ability to address common mixing challenges, providing clarity, cohesion and punch.
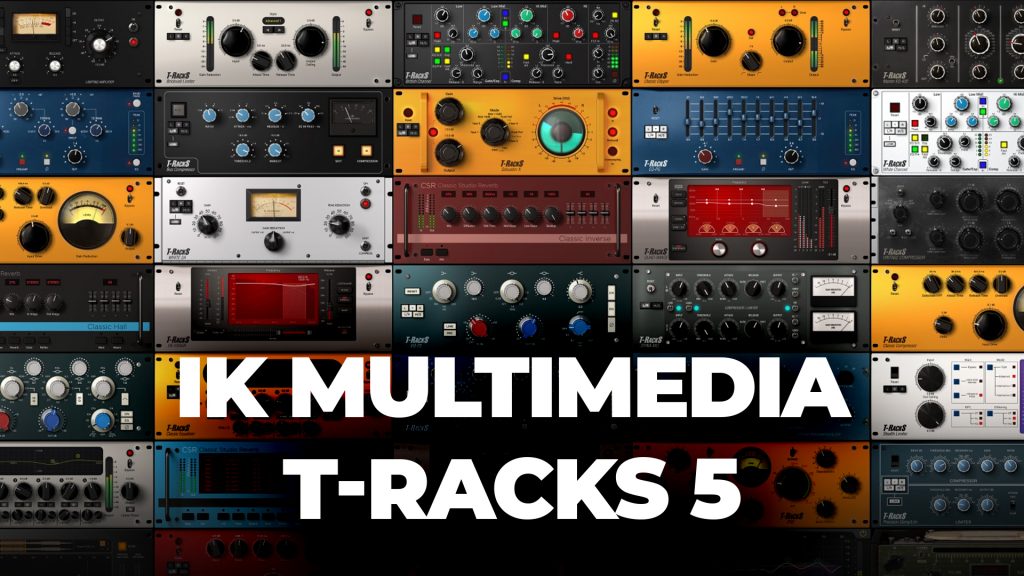
Don’t miss this chance to get the T-RackS 5 for just $39.99 (regularly $199.99). This discount is limited, so act now!
Also, be sure to check out other deals on sounds and synths at https://audioplugin.deals/shop/
New To Audio Plugin Deals?
Are you new to the site? How do all the sales, discounts, and deals work? Not a problem.
Here’s everything you need to know about acquiring discounts and other exclusive deals → https://audioplugin.deals/how-it-works/